Outlook organization tips:
5 ways to tame the email pile
Microsoft's Outlook is an irreplaceable tool for countless organizations and a veritable legion of people around the globe—but it's not a beloved one by any stretch. Nobody actually enjoys sifting through a stuffed inbox or responding to meeting requests all day long; you want to open your inbox, do what you need to do, and get the heck out as fast as possible.
That's where these Outlook organizational tips come in. Adopting these five simple practices will make diving into your inbox less painful—and far less time consuming.
1. Use folders to reduce Inbox clutter
It seems easy to let emails just pile up in your Inbox, until you try to find something and have to suffer through a manual search. Instead, move messages to a custom folder that relates to the company or the message. It’s just like using a file cabinet.
Custom folders are easy to create, manage, and search; and there are no limits to size or count except disk space or limitations imposed by your system administrator. But don’t go crazy! Too many folders can also slow Outlook's responses. You wouldn’t create a folder in a file cabinet for just a dozen documents. If you’re creating one folder for each client or each company, or even by subject/content (such as taxes, receipts, travel), it’s ok to consolidate the infrequent communications into a Misc folder.
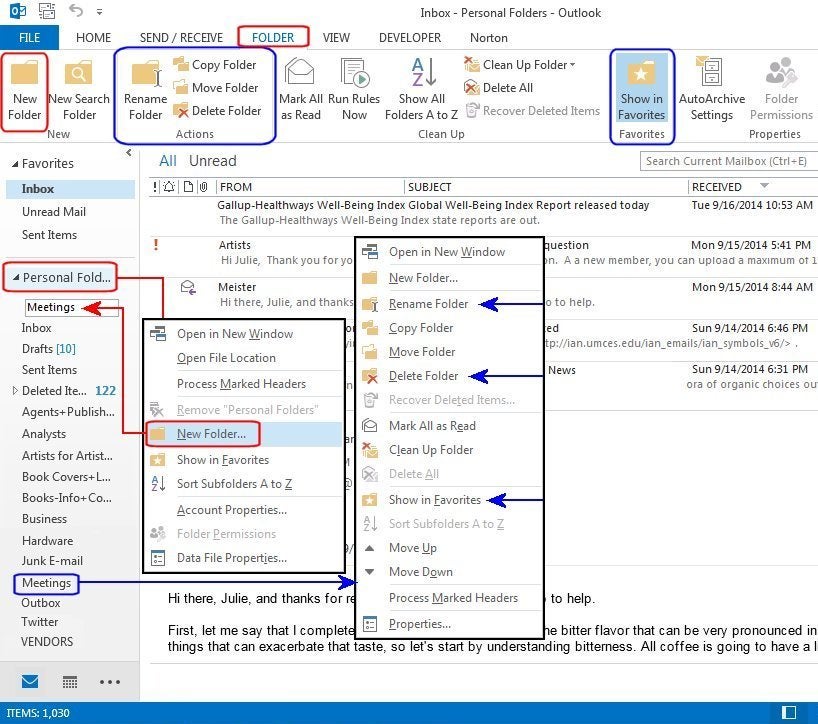
Here's how to get started with custom folders.
- Right-click on the Personal Folders option in Outlook's left-hand navigational pane, then choose New Folder from the dropdown list. (Alternatively open the Folder tab and click the New Folder button from the "New" group.)
- In the Field box, type the folder name (e.g., Meetings) and press Enter. If you change your mind or notice a typo, right-click the new folder and select Rename Folder or Delete Folder. You can also Move it, Copy it, or add it to the Favorites section via the right-click menu. You can also select any one of these buttons from the Actions group.
- Notice all the other Folder options on the Ribbon menu. You can Search, Sort, Archive, Apply Rules, Mark all Emails as Read, Clean Up, etc.—everything you need to manage your folders.
2. Create and assign categories
Categories help organize the emails in your active Inbox so you can quickly determine the status of each email; for example: Pending, Due, Done, etc. You can also sort by categories. So, for example, if you only perform email maintenance once a week, you can sort by category, quickly locate all the "Done" emails, and then move them to their corresponding folders.
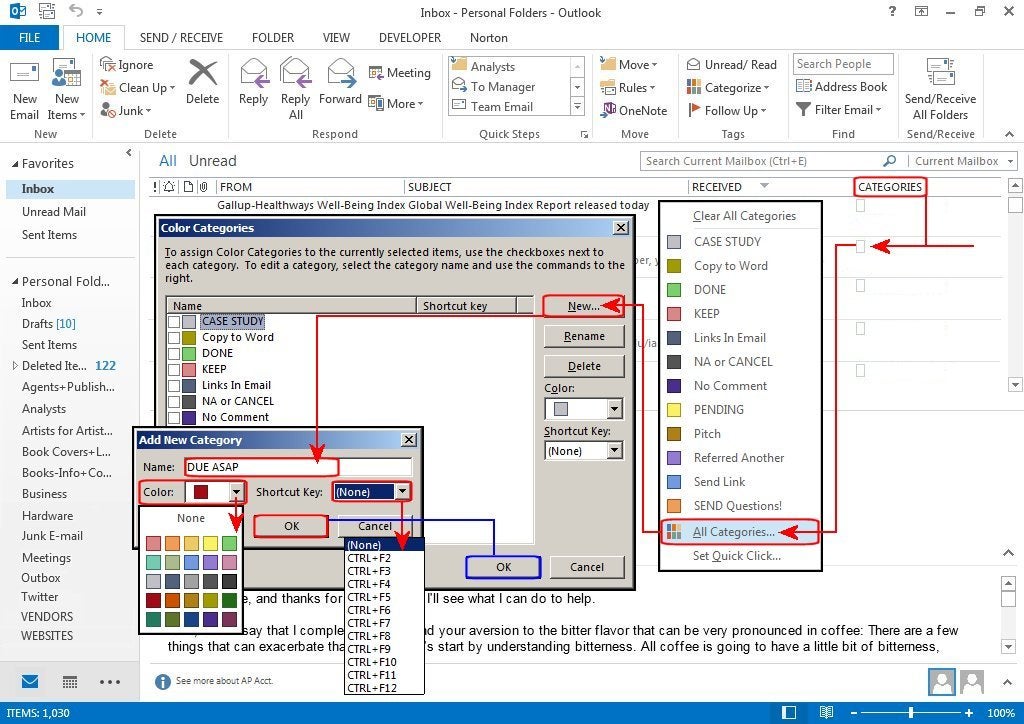
- To create a new category, right-click on the transparent square box in the Categories column, and select "All Categories" from the dropdown list. In the Color Categories dialog box, click the New button. Enter a Name for your category in the "Add New Category dialog box.
- Click the down-arrow beside the Color field and choose a color for the category. Next, click the down-arrow beside the Shortcut Key field and choose a shortcut key (CTRL+F2 thru CTRL+F12) for the category. These keys are not used by other functions in Outlook, so they are available for category shortcuts.
- Click OK in this dialog, then click OK again in the Color Categories dialog box and the new category is added to your list. Note: there are 25 colors, but only 11 shortcut keys, so choose the most frequently used categories for your shortcut keys.
- To attach a category to an email, select the email, then right-click anywhere in the Categories column, and select a category from the dropdown list. Note: emails can have more than one category. To remove a category, right-click anywhere in the Categories column on the selected email, and click Clear All Categories from the dropdown list. This will only clear all the categories attached to the selected email. It will not affect your other emails.
3. Quick Steps
Quick Steps is a feature that allows you to automate several tasks into a single step (or click) such as Moving emails to a specific folder, deleting, copying, forwarding, etc. It's a wonderful time saver for users who get lots of emails from a single sender, be it junk mail or a close friend.
Once you define a Quick Step to automate a task, you can then click any email, then click the automated task from the Quick Steps menu, and Outlook performs all the steps. You can also assign the task to an open, unused shortcut key. (Again: Only nine shortcut keys are available, so choose wisely).
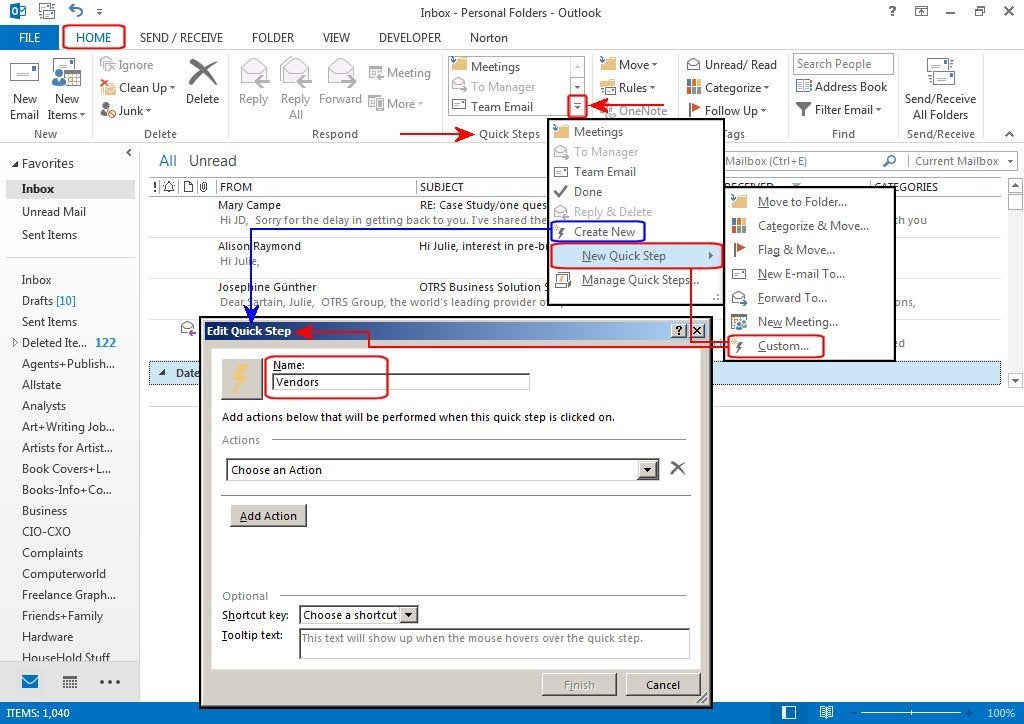
- To create a new Quick Step: From the Home tab, click the bottom down-arrow in the "Quick Step" group, and select Create New from the list; or select New Quick Step from the first list and Custom from the second list. In the Edit Quick Step dialog box, enter a name for this task in the Name field.
- Next, click Choose An Action, click the down-arrow, and select one from the "Move to Folder" drop-down list. Another field appears under your "Move to Folder" action—"Choose Folder." Select a target folder from the list. (Such as "Vendors" in the visual example below.)
- You can stop here and just click Finish, or click the Add Action button and Choose Action again for a second automated task, such as "Mark As Read". In the Optional pane, you can click the Shortcut Key field and select a key from the list (CTRL+SHIFT+1 thru CRTL+SHIFT+9). Then enter a tooltip in the Tooltip Text box. Click Finish and you're done.
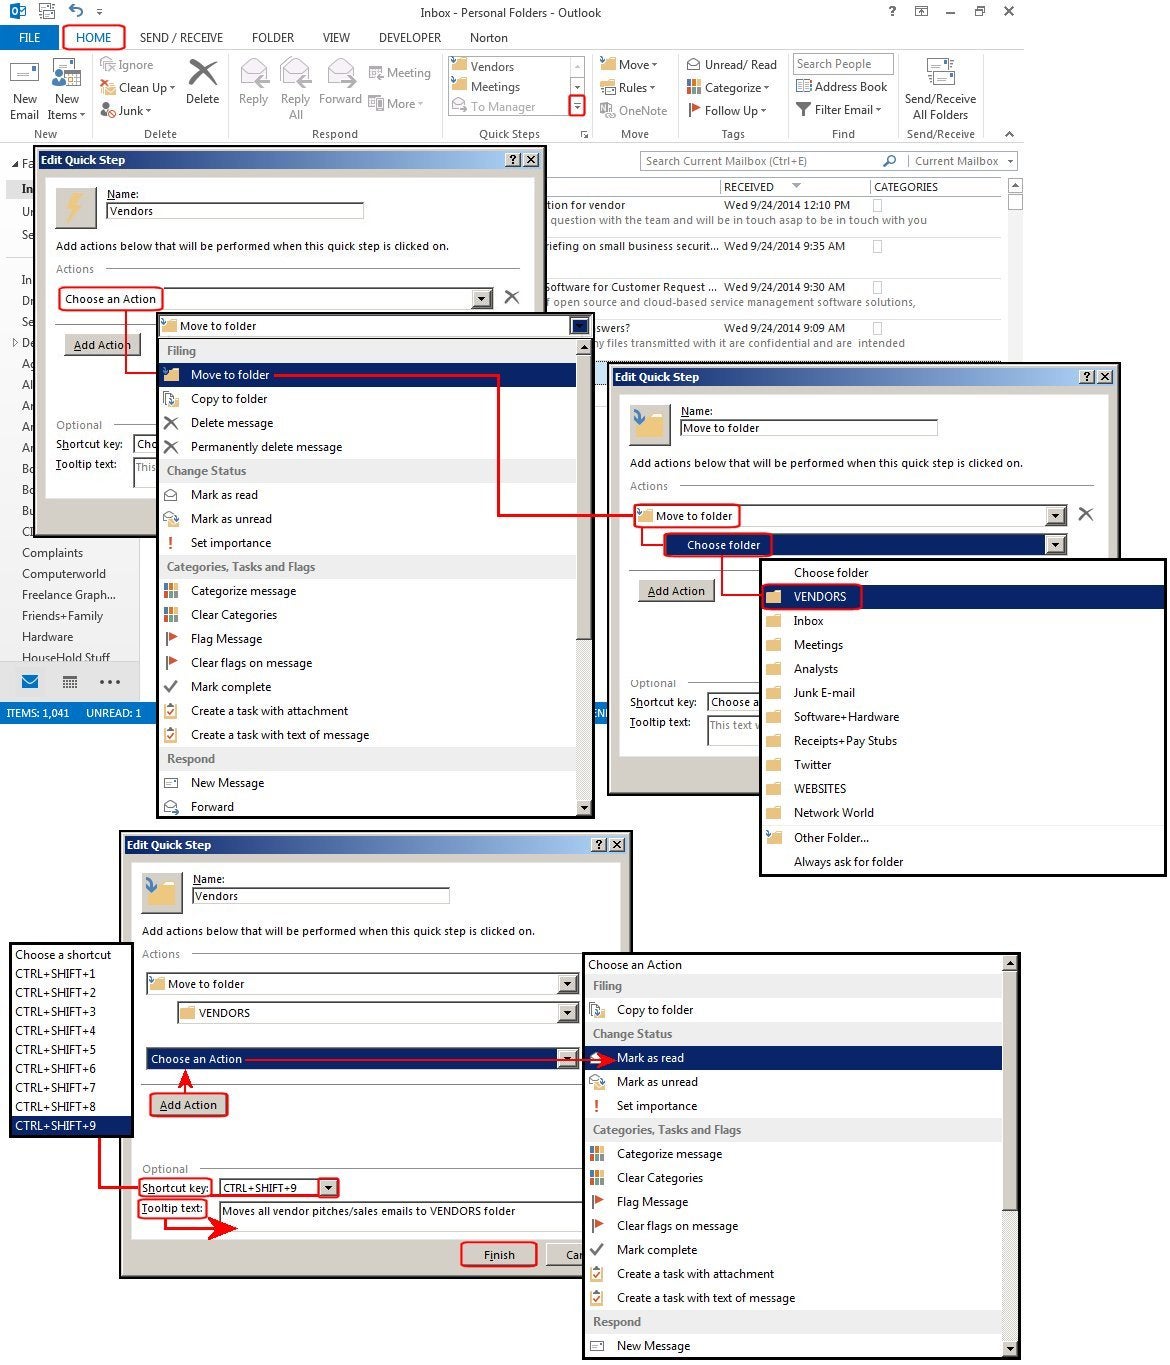
- To use this task—continuing with our Vendors example—click on an email sent by a vendor, and then click Vendors from the list. The email is marked as read and moved to your Vendors folder, all in one simple step. Alternatively, you can use the shortcut key you defined, but note that the keyboard shortcuts only work on the number keys above the letters. It does not recognize the numbers on the numeric keypad.
4. Email templates
How often have you sent the exact same email to dozens (or more) people with nothing changed except the recipient's name and email address? Email templates make this task a snap.
- Locate one of these form letter-type emails in your Sent folder. Forward it to yourself and edit out all the custom information such as the recipient's name, email address, company, etc. Then click File > Save As, enter a filename, and select Outlook Template as the file format.
- To use/open the template: From the File tab's "New" group, choose New Items > More Items > Choose Form, and then click the down-arrow to view the list of forms. Select User Templates in file fystem, then choose your saved email template from the list and click Open. Add a custom salutation, insert an email address, and simply click Send.
5. Conditional formatting rules
This handy feature lets you create rules for conditional formatting. Wait, what?
Basically, it's just a few customized attributes that you can automatically add to incoming emails to make them stand out. For example, you can change the font attributes—underline, bold, italic (bold and italic are font styles of specific typefaces)—and the colors based on a rule (or condition) that you define in the "Conditional Formatting" section of Advanced View Settings.
- From the File tab's "Current View" group, choose View Settings. Click the Conditional Formatting button then, in the Conditional Formatting dialog box, click the Add button and enter a descriptive name for what this rule/condition does. I entered "Editor" in the example shown above because I want the emails from my editor to really stand out and grab my attention. (Woohoo!--Ed.)
- Click the Font button to define the format for the typeface; i.e., font name, color, and attribute such as Underline or Strikeout (for bold and italic, choose a font that offers these attributes as part of the typeface). Click OK when you're done.
- Next, click the Condition button and define a condition; for example, you can choose a specific word (or words) in the email or subject line, an email address From or To, where your email address appears in the email (To, From, CC, etc.), and/or a general time or date (today, yesterday, last week, last month, etc.). Again click OK when you're done.
- When the dialog box closes, click yet OK again in the Conditional Formatting dialog box, then click OK again in the Advanced View Settings dialog box. Now, whenever I receive an email from my editor at BookCoversPlus, all those emails will display on my screen in a purple, STENCIL font, as shown above.
TAG: Tech, tech, apple, windows, bootstrap, html5, css3, javascript, responsive, design, branding, logo, graphic, desain, love, artwork, graphics, computer, indirabali

Comments
Post a Comment