How to use a Nintendo Switch Pro controller with a PC
Many people play games on PC with a mouse and keyboard, but some genres are just better suited to controllers. If you’ve got a Nintendo Switch Pro controller, you can put it to work with your Windows computer in barely any time at all.
Our step-by-step instructions cover using a Switch Pro controller with a PC via wired or wireless connection—as well as how to make it work properly with your games.
How to connect a Switch Pro controller to your PC
Wireless
The Nintendo Switch Pro Controller supports standard Bluetooth, allowing you to pair it wirelessly with your PC. (If your computer doesn’t support Bluetooth, you can still use the wired method below.)
Your controller must be at least partially charged before beginning the Bluetooth pairing process.
Windows 10
- In your computer’s System Settings, choose Bluetooth & other devices. You can also jump straight to these through a system search for “bluetooth”.
- Make sure Bluetooth is on. The toggle will be blue, with text underneath that says “Now discoverable as <PC name>.”
- On the Nintendo Switch Pro controller, find the sync button, which sits next to the USB-C connector at the top of the controller. Press and hold it until you see the green lights at the bottom of the controller flash in a ripple effect.
- Back on your computer, click on Add Bluetooth or other device.
- Your system should show a list of devices available for pairing. Choose “Pro Controller.”
- The pairing process will begin, with the message of Connecting appearing below the device name.
- A confirmation screen will then appear, affirming that you can now use the controller with the system. The bottom of the Switch Pro controller should also show just one square lit in green (typically, the far left one).
Windows 8
- In your computer’s PC Settings, choose PC and devices > Bluetooth. You can also jump straight to these through a system search for “bluetooth”.
- Make sure Bluetooth is on. You’ll see text that says “Your PC is searching for and can be discovered by Bluetooth devices.”
- On the Nintendo Switch Pro controller, find the sync button, which sits next to the USB-C connector at the top of the controller. Press and hold it until you see the green lights at the bottom of the controller flash in a ripple effect.
- Back on your computer, your screen should show a list of devices available for pairing. Click on “Pro Controller,” then choose Pair.
- The pairing will begin, with a gray progress bar showing below the controller’s name.
- When the process is complete, you’ll see the word Connected. The bottom of the Switch Pro controller should also show just one square lit in green (typically, the far left one).
Note: To later use the controller with your Windows 10 or 8 PC, press any button on the controller. The green lights at the bottom should go through the ripple pattern until reconnection is complete, at which point you’ll see just one square lit up.
Wired
Your Nintendo Switch Pro controller should work with any USB-A to USB-C cable, with the easiest option being the one that comes included with the controller.
- Connect the USB-A end of the cable to a USB port on your computer.
- Plug USB-C part of the cable into the top of your Nintendo Switch controller.
- Wait for Windows to recognize it. Usually, you’ll hear an audio cue as this process happens.
- If Steam is running on your system, a ring of blue light will light around the Home button.
On occasion, the system may not recognize your controller on the first try—we’ve gotten it to work after disconnecting the cable from the controller and then reseating it again firmly.
How to configure Steam for use with a Switch Pro controller
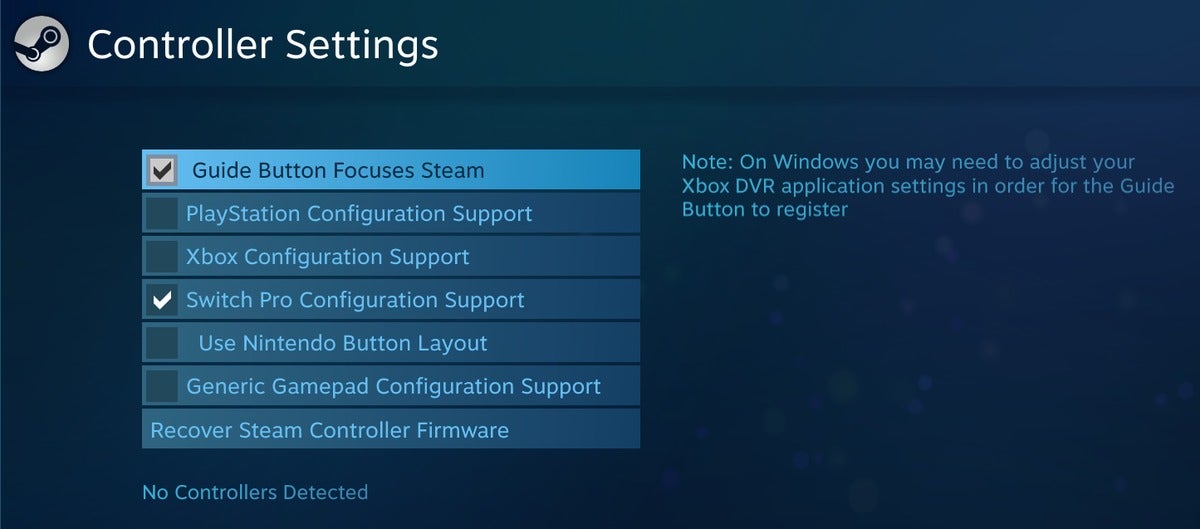
Some game launchers will automatically recognize the Switch Pro controller once you’ve paired it or plugged it into your computer, but Steam requires you to enable support before it’ll work with your library of games.

- In Steam’s menu bar, go to Steam > Settings > Controller > General Controller Settings
- Check the box next to Switch Pro Configuration Support
- If you prefer the default Nintendo layout, also check Use Nintendo button layout. Otherwise, leave it unselected to mimic the default Xbox controller layout.
TAG: Tech, tech, apple, windows, bootstrap, html5, css3, javascript, responsive, design, branding, logo, graphic, desain, love, artwork, graphics, computer, indirabali


Comments
Post a Comment